A reverse proxy set-up can solve a few problems. For example you can load balance servers, secure a server by hiding it behind a proxy, or load balance an Internet connection. In this HelpFile our goal is to offer access to a server on our private LAN through a higher bandwidth Cable modem connection, but without making changes to our server's network setup.
Consider the Following
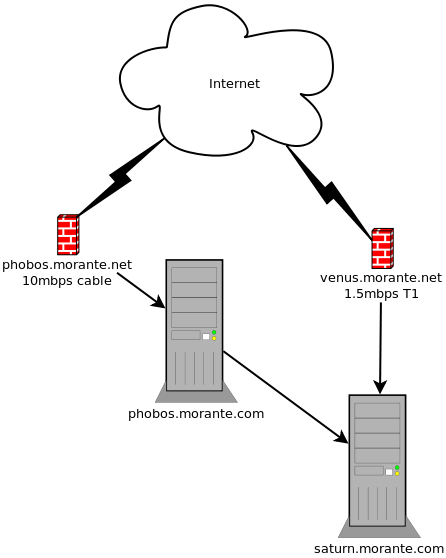
We have a private web server named saturn.morante.com, running Apache HTTP server on port 80. Saturn holds some pretty large files that we want to make available on the Internet. Saturn is currently accessible from the Internet as venus.morante.net over a T1 line behind a firewall/router on port 80 through NAT port forwarding. However our T1 line is pretty slow and we don't want to congest it too much when these files are being accessed. Additionally, we don't want to put too much load on saturn when accessing such content.
We also have a cable modem connection which offers higher bandwidth that we use for general Internet surfing and downloading of large files. It would be great if we could use this in the reverse, that is to access the files off of our saturn server from a remote location using the cable modem instead of the T1. The problem is that saturn is configured to use our T1 and we don't want to change that since saturn offers several other important services that must be accessed from the T1.
The solution is to setup a reverse proxy server on our higher bandwidth (but higher latency) cable modem connection. Since it's just HTTP traffic, the higher latency connection won't have such a negative affect. It's better to reserve the lower latency more reliable bandwidth on the T1 for important stuff such as VoIP or VPN, and use the cable modem connection for the less important outgoing HTTP traffic. At the same time, our reverse proxy will cache the content so saturn doesn't get overloaded when our web site gets heavy usage.
Requirements
There are many commercial and open source proxy servers, Apache included. However, I happen to like Squid a lot. It's simple, straight forward and it's what I am familiar with. In this HelpFile we will be using Squid 3.0.
- A Spare computer or server that meets the minimum requirements to run Squid
- Squid 3.0
- The installed OS in configured to use (in this case) our high bandwidth cable modem connection
- Optionally, you could install Webmin to manage Squid
Install Squid
Installing Squid is easy, especially on modern operating systems like FreeBSD, Fedora, Suse, and Ubuntu. If you are using FreeBSD just use the ports to install Squid 3.0 as root:
cd /usr/ports/www/squid30
make install
Configure Squid
Normally I would use Webmin to configure stuff, but in this case Webmin's Squid GUI doesn't provide the needed configuration screens to successfully setup a reverse proxy server. So with much disgust, we must open up the squid.conf configuration file in your favourite text editor. I recommend SSH'ing to your Squid server as root from a GNOME desktop and using Gedit. Or if your running a GUI on your server, open it up directly on their. On FreeBSD the squid.conf file is located under /usr/local/etc/squid/squid.conf.
You see now why I like to use Webmin. The Squid configuration file is pretty huge, but thankfully not so cryptic (like Sendmail). We will be changing and adding a few lines in this file. So make sure your favourite editor shows line numbers or has a search function.
The first thing we will do is tell Squid to operate in reverse proxy mode, and setup a default host name which will be useful when connecting to the reverse proxy by IP address or an alias. Around line 881 or under the NETWORK OPTIONS comment, go ahead and add the following:
http_port 80 accel defaultsite=phobos.morante.net vhostWhere "phobos.morante.net" is the Internet host name of the proxy server. The port number (in our example 80) is the port you want to have your reverse proxy listen on for connections. Most of the time this will be port 80, but some users may have reasons to use an alternate number if your ISP doesn't allow outgoing traffic on port 80.
Next we tell Squid where were to find and how to connect to the web server. In Squid, this is referred to as a "peer cache". Only our web server contains all the information we need, therefore Squid only needs to connect to it as a parent "peer" to get that "cached" data.
Around line 1451 go ahead and add the following:
cache_peer 192.168.0.248 parent 80 0 no-query originserver login=PASS name=saturnJust replace the IP address (192.168.0.248) and port number (80) with your web server's IP address and port number (you could use a DNS host name instead of an IP address, but I find that things work "better" if you just use the IP address). If your web server requires a username and password, keep the option "login=PASS" to have Squid pass the login info to Apache. Otherwise just remove that option. The "name=" option is how Squid will internally identify this server in it's configuration file. You can use anything you'd like here.
Now we create some ACL's giving users permission to access our webserver through a specific host name. Around line 580 or under the ACL section, add in:
acl saturn_users dstdomain phobos.morante.netReplace "phobos.morante.net" with the DNS hostname you will use to access your reverse proxy server over the Internet (the same thing you used for "defaultsite"). The ACL name "saturn_users" can be what ever you want. We will use this name to apply the ACL to permissions that we will create.
Now lets setup general HTTP access permission for all users on the proxy. Around line 629 or under the ACL section, add in:
http_access allow saturn_usersMake sure you replace "saturn_users" with whatever ACL name you used.
Finally, allow the proxy users access to the web server and deny everything else. Around line 1495 or under the "cache_peer_access" section, add in:
cache_peer_access saturn allow saturn_users
cache_peer_access saturn deny all
Once again replace "saturn" with the peer cache name you used and replace "saturn_users" with the ACL name you used. Save the configuration file and start up Squid using Webmin or the command line. On FreeBSD you must first add the squid_enable="YES" directive in your "/etc/rc.conf" file. Then you can use the following command to startup:
/usr/local/etc/rc.d/squid startYour Squid reverse proxy server is ready.
Configure your Network
Now that your reverse proxy is ready, it's time to test. Open up a web browser and type in the host name (or IP address) and port number of your Squid proxy server. If your using a host name, make sure it's DNS resolves to your proxy server's internal IP address. In our set-up, phobos.morante.com is the internal DNS name of our reverse proxy. If we type that into our web browser, we should get the same thing that saturn.morante.com would bring up.
What you need to do now is create a NAT port forward on your cable modem's firewall/router to pass the external requests on to your reverse proxy. The NAT forward is to the port number that your proxy server is listening on. You also need to create a DNS hostname (the one you used on your ACL in the Squid configuration file) to point to the cable modem connection's IP address.
For example, our setup uses phobos.morante.net as the ACL hostname. We must ensure that externally (on the Internet) "phobos.morante.net" resolves to the IP address assigned to our cable modem connection. Then the firewall/router will forward the HTTP requests on to phobos.morante.com, which will forward to request to saturn.morante.com.
A Real Life Functional Example
http://phobos.morante.net:10080 is a reverse proxy server (running on a PowerPC Mac Mini with OS X 10.5) that I use to access my vast library of FreeBSD ports, public downloads, and private password protected downloads. I can offer access to it's contents without congesting my T1 by using phobos.morante.net, while at the same time keeping the load on my web server pretty light, and access it through the T1 by using venus.morante.net.

.png)